|
|
| A. What is a Schlumpf gearing system? |
|
| |
|
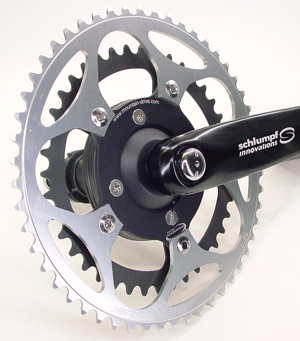
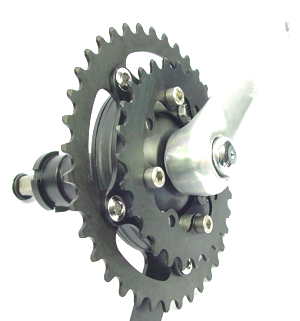
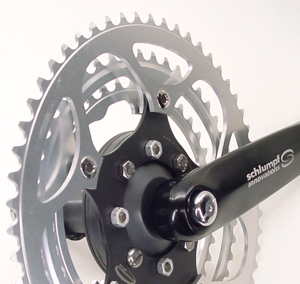
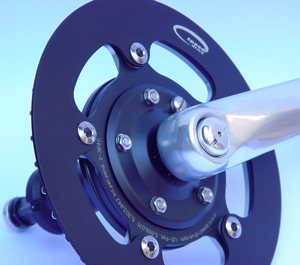
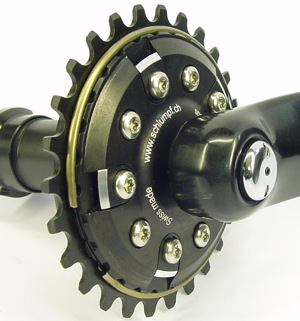
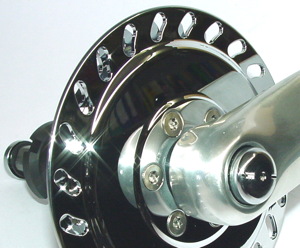
A.1.1. Structure of Schlumpf - gearing systems
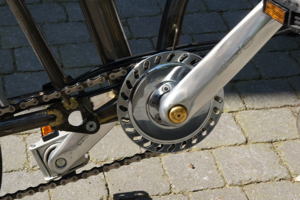
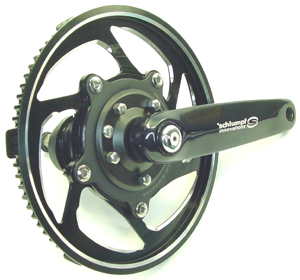
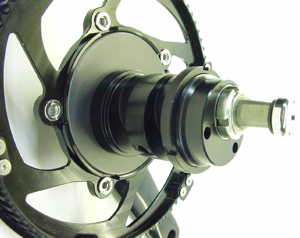
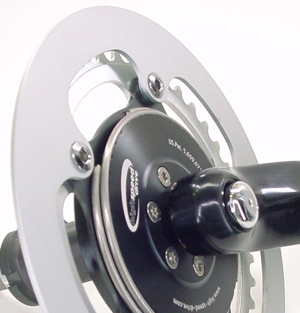
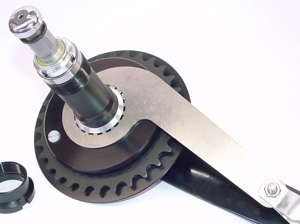
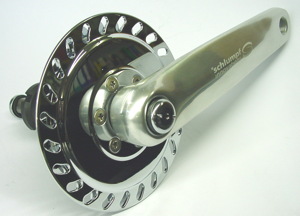
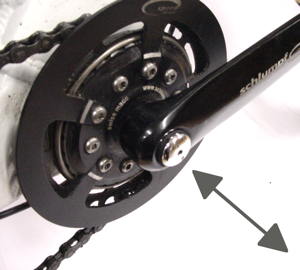
The Schlumpf drive is an ultra thin planetary gearing system located at the right end of the bottom bracket, between bottom bracket and right crankarm.
Installation of a Schlumpf drive hardly changes neither position of the chain nor position of the crankarms.
That's the reason, why retrofitting a Schlumpf drive is very easy in most cases.
|
|
| |
zurück |
A.1.2. How to shift?
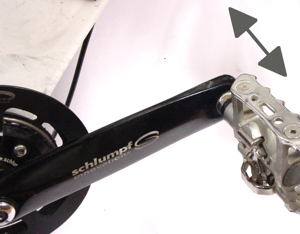
To activate a Schlumpf drive, there is no need for cables, derailleurs and the like.
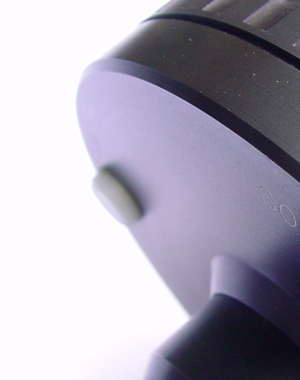
Gears are changed by a simple push on a button, located at the end of the axle.
Push on the right side to shift up or down (depending which drive you use), push on the left side to shift back into direct drive.
If you use clic-in pedal systems or very small shoe size, use the kickplates (easy-shift levers), that allow to shift on the whole surface of the crankarm.
Every Schlumpf drive is available with two different activating forces: higher resistance for foot activation (standard bicycles), lower resistance for hand activation (hand bikes). |
|
| |
|
A.2. mountain-drive: what's particular?
mountain-drive reduces gears.
This means: On a push of a button all existing gears are reduced by a factor of 2.5.
Therefore, it's not just a "nice-to-have" gadget, that gives some additional gears - no - it's more than a doubling of the number of gears, mostly without any overlap!
You can imagine the effect as follows: if you have a 50 tooth chainring installed, on a push of a button this big chainring acts like a 2.5 times smaller one, means a 20t. chainring!
If you compare this range 50 -> 20 with a triple chainring, you can easily see, that with three chainrings, you never get such a wide range. |
zurück |
| |
|
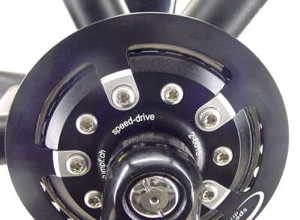
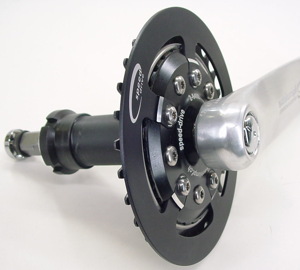
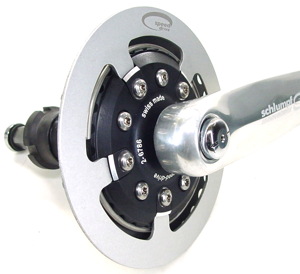
A.3. speed-drive: what's particular?
speed-drive increases gears.
This means: On a push of a button all existing gears are increased by a factor of 1.65.
Therefore, it's not just a "nice-to-have" gadget, that gives some additional gears - no - it offers a much wider gear range from very low to very high gears.
You can imagine the effect as follows: if you have a 30 tooth chainring installed, on a push of a button this small chainring acts like a 1.65 times bigger one, means a 50t. chainring!
If you compare this range 30 -> 50 with a triple chainring, you can see, that you get a similar wide range as with three chainrings! |
 |
| |
|
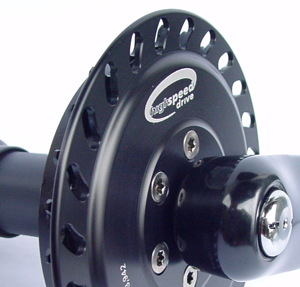
A.4. high-speed-drive: what's particular?
high-speed-drive increases gears dramatically!
This means: On a push of a button all existing gears are increased by a factor of 2.5.
Therefore, it's not just a "nice-to-have" gadget, that gives some additional gears - no - it's more than a doubling of the number of gears, mostly without any overlap!
You can imagine the effect as follows: if you have a small and compact 27 tooth chainring installed, on a push of a button this chainring acts like a 2.5 times bigger one, means a 67t. chainring!
If you compare this range 27 -> 67 with a triple chainring, you can easily see, that no triple chainring set can offer such a wide range. |
 |
| |
|
| A.5. Applications and limits |
|
| |
zurück |
A.5.1. Maximum torques
All Schlumpf gears are calculated for a torque of 250 Nm.
Short physical excursion: if there is a weight of 100 kg acting on a pedal (equals a power of about 1'000 Newton) with a lever arm of 170mm length, torque is 170 Newton meter (Nm). This is the torque of a midsize car! The only difference: the engine of this car has more power, because it combines this torque with a high number of revolution of the engine.
That's why all Schlumpf drives can be used on tandems as well as rikshaws and other heavy duty applications.
Please consider that the rear gearing component may allow a reduced torque only. |
|
| |
|
| A.5.2. Schlumpf - drives for mountain bikes
Schlumpf-drives are strong enough to be used on mountain bikes.
Indeed, there are two restrictions:
- Many mountain bike frames don't allow to mount a (big) chainring at the position of the middle chainring of a triple chainring set due to the geometry of the rear chainstay (see sketch on the right). Don't mount the chainring more outside, as this would cause a lot of derailment for the chain.
- Sealing of Schlumpf drives are optimized for lowest friction losses. Therefore, sealing is not designed to withstand high pressure cleaning with damp or water, as normally done on mountain bikes. This would cause corrosion inside of the drives. |
 |
| |
|
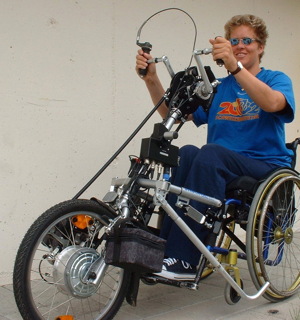
A.5.3. Schlumpf - drives for handbikes
A very popular application are handbikes. mountain-drives for use on handbikes come with a special shifting shaft, which is configured for lower pressure at changing gears.
Big advantage on a handbike: you can always shift, either at full speed as well as at standstill!
For higher speeds, no problem to use a speed- or even high-speed-drive on a fast handcycle. |
 |
|
zurück |
| B. What Schlumpf drives are good for? |
|
| |
|
B.1. Extension of gearing range
As shown under section A.2. to A.4., installing a Schlumpf drive is a quantum jump with regard to the gearing range.
It doesn't add just some intermediate gears but amplifies the range either on the upper or lower end of speeds or on both sides! |
|
| |
|
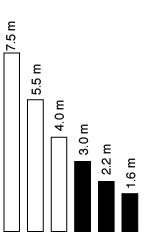
B.2. Lowest possible gears -> mountain-drive
If you are looking for lowest possible gears, mountain-drive is your ultimate choice.
A chainring with 50 teeth -> equals a chainring with 20 teeth in low gear mode.
A chainring with 40 teeth -> equals a chainring with 16 teeth in low gear mode.
Smallest possible chainring is 34t. -> equals a chainring with 14 teeth in low gear mode.
For very special applications there is a chainring with 27t. available -> equals a chainring with 11 teeth in low gear mode.
If you use a larger than the original chainring, you get both higher and lower gears.
Biggest chainring available from Schlumpf: 75t. -> equals a chainring with 30 teeth in low gear mode.
Black bars in the diagram on the right show additional gears in combination with mountain-drive and a "good old" 3-speed-hub -> you get nearly the gear range of a mountain bike!
Please find a gear range calculator (for meters per revolution) here:
-> in combination with derailleurs
-> in combination with internal hubs
Please find a gear range calculator (for gear inches) here:
-> in combination with derailleurs
-> in combination with internal hubs |
|
| |
zurück |
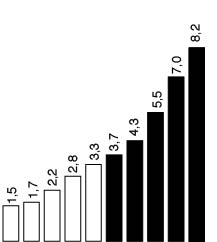
B.3. Highest possible gears -> high-speed-drive
If you are looking for highest possible gears, high-speed-drive is your ultimate choice.
The standard chainring with 27 teeth -> equals a chainring with 67 teeth in high gear mode.
A chainring with 30 teeth -> equals a chainring with 75 teeth in high gear mode.
A chainring with 34 teeth -> equals a chainring with 85 teeth in high gear mode.
For very special applications there is an adapter for BCD130mm available, which allows to mount chainrings of 38t. or bigger-> equals chainrings with 95t. (or bigger) in high gear mode.
Black bars in the diagram on the right show additional gears in combination of high-speed-drive with a 5-speed-hub.
Please find a gear range calculator (for meters per revolution) here:
-> in combination with derailleurs
-> in combination with internal hubs
Please find a gear range calculator (for gear inches) here:
-> in combination with derailleurs
-> in combination with internal hubs |
 |
| |
|
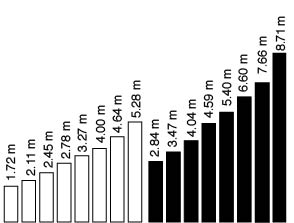
B.4. Amplification of low and high gear range without extrem speeds -> speed-drive
If you wish a wide range but not extremly low or high gears, speed-drive is your choice.
speed-drive "type 08"
allows to mount chainrings with 27t. or bigger. This equals chainrings of 45t. or bigger in high gear mode.
A chainring with 30t. equals 50t. in high gear mode
speed-drive "type BCD110" can be equipped with chainrings of 34t. or more. Such a chainring in high gear equals a 56t. chainring.
Biggest chainring available with BCD110 is 53t. Equals one with 87t.
Black bars in the diagram on the right show additional gears in combination of speed-drive with a wide spread 8-speed-hub.
Please find a gear range calculator (for meters per revolution) here:
-> in combination with derailleurs
-> in combination with internal hubs
Please find a gear range calculator (for gear inches) here:
-> in combination with derailleurs
-> in combination with internal hubs |
 |
|
retour |
C. Combinations with different gearing systems |
|
| |
|
C.1. General reflections about increase of torque at the rear gear component due to a gearing system at the bottom bracket
At first glance a mountain-drive increases entry torque at the rear gear component by a factor of 2.5.
It's worth to examine this assumption more in detail!
If you climb a certain slope with a certain speed, there is a certain tension on the chain and therefore a given torque entering the rear component.
If you shift down into low gear and you still climb with the same speed, tension on the chain is still the same and the entry torque on the rear component also. The only thing that changed is the frequency of your pedaling and therefore less load on your knees!
This means: there is only an increase in load, if:
- you climb the same slope with higher speed
- you climb a steeper hill with the same speed
- you climb a slope, that you couldn't have climbed without using a mountain-drive.
In this case, load starts to rise slowly when the slope gets steeper.
This is the explanation, why ten thousands of internal hubs are working great in combination with any Schlumpf drive and only very little failures have been reported in all the past 20 years. |
|
| |
|
C.2.1. Combination mountain-drive and derailleur
If combining a derailleur with mountain-drive, please check the chainline carefully. Chainring should be positioned at the same distance from the centerline of frame as the medium cog of the derailleur cog set.
There are solutions, if position of the chainring doesn't match the chainline:
- mount the chainring on the left or right side of the spider
- use washers to give 2mm additional clearance
- use wider cone rings
- use the +10mm version
Big chainrings in combination with 9- or 10-speed derailleurs can cause problems, if the chain derailment is not symmetrically.
mountain-drive chainrings at their circumference have a thickness of 2mm. Please check, if your chain allows this thickness (inner distance between chain links should be at least 2.3mm). |
 |
| |
|
C.2.2. Combination mountain-drive and internal hub
Same rules apply for the combination with internal hubs!
For a combination with a Rohloff hub (not recommended by Rohloff, as torque coming from the mountain-drive can exceed limitation of entry torque of the Rohloff hub) best to use the 10mm longer axle in addtion with wider cone rings on the left as well as on the right side. This is not necessary on bikes with long distances from bottom bracket to rear axle such as most recumbents. |
zurück |
| |
|
C.3.1. Combination speed-drive and derailleur
If combining a derailleur with speed-drive, please check the chainline carefully.
Chainring should be positioned at the same distance from the centerline of frame as the medium cog of the derailleur cog set.
A correct chainline is less sensitive than on a mountain-drive, as chainring diameter is smaller and therefore the tangential travel, where the chain "enters" the chainring, is shorter.
There are solutions, if position of the chainring doesn't match the chainline at all:
- mount the chainring on the left or right side of the spider
- use washers to give 2mm additional clearance
- use wider cone rings
- use the +10mm version in combination with cone rings on the left and right side
speed-drive chainrings have a thickness of 2mm. Please check, if your chain allows this thickness (inner distance between chain links should be at least 2.2mm). |
 |
| |
|
C.3.2 Combination speed-drive and internal hub
speed-drive is ideal for the combination with internal hubs, that offer a wide range such as 7-, 8-, 9- or 11-speed hubs.
It can even be combined with a Rohloff hub without restrictions.
If using the type "BCD110", you can mount the chainring either at the left or right side of the spider, while the type "08" has one position of the chainring only.
A correct chainline is less sensitive as on a mountain-drive, as chainring diameter is smaller and therefore the tangential travel, where the chain "enters" the chainring, is shorter.
There are solutions, if position of the chainring doesn't match the chainline at all:
- mount the chainring on the left or right side of the spider (type "BCD110" only)
- use washers to give additional clearance between spider and chainring (type "BCD110" only)
- use wider cone rings
- use the +10mm version in combination with cone rings on the left and right side
speed-drive chainrings have a thickness of 2mm. Please check, if your chain allows this thickness (inner distance between chain links should be at least 2.2mm). |
zurück
 |
| |
|
C.4.1. Combination high-speed-drive and derailleur
Even less problems with a transversal chainline: high-speed-drive chainring is very small, and therefore short tangential travel, where the chain "enters" the chainring.
There are solutions, if position of the chainring doesn't match the chainline at all:
- use wider cone rings
- use the +10mm version in combination with cone rings on the left and right side
speed-drive chainrings have a thickness of 2mm. Please check, if your chain allows this thickness (inner distance between chain links should be at least 2.2mm). |
 |
| |
|
C.4.2. Combination high-speed-drive and internal hub
Even less problems with a transversal chainline: high-speed-drive chainring is very small, and therefore short travel, where the chain "enters" the chainring.
There are solutions, if position of the chainring doesn't match the chainline at all:
- use wider cone rings
- use the +10mm version in combination with cone rings on the left and right side
high-speed-drive chainrings have a thickness of 2mm. Please check, if your chain allows this thickness (inner distance between chain links should be at least 2.2mm). |
|
| |
zurück |
C.5. Combination with coaster brake
Older gearing systems (till 2009) had a non-symmetrical clutch. Newer ones have a modified clutch design, that allows full torque in both directions.
Please consider, that a coaster brake (back pedal brake) has different activation forces in high and low gear mode. Not a problem in reality, but you should be aware of! |
|
|
|
| D. Different types |
|
| |
|
| D.1. mountain-drive |
|
| |
|
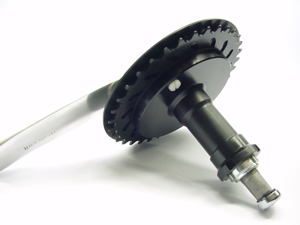
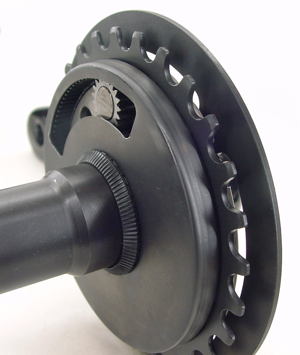
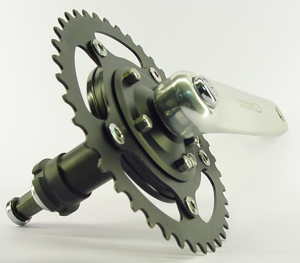
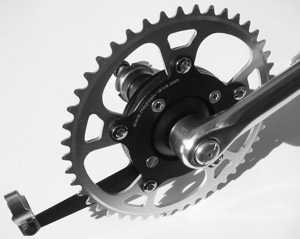
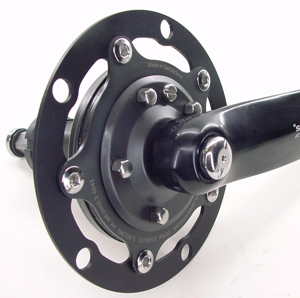
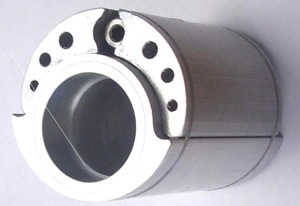
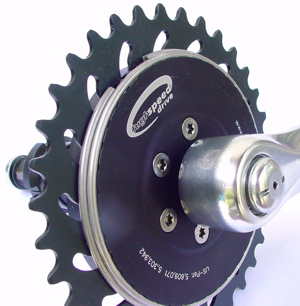
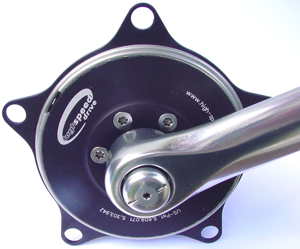
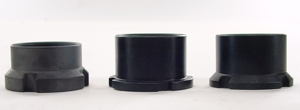
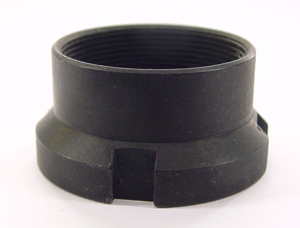
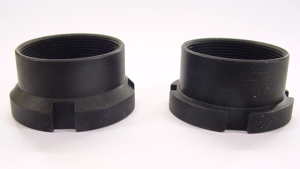
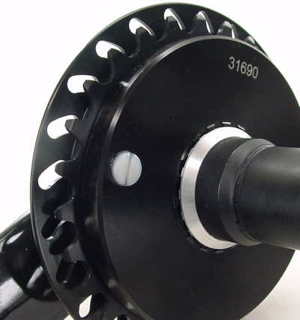
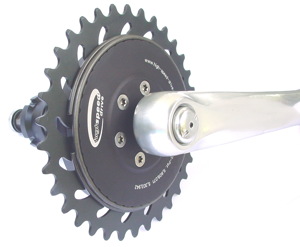
D.1.1. mountain-drive standard version
mountain-driv in its standard version is designed for bottom bracket shells of 68 to 72mm width. Each mountain-drive comes with an aluminum spider with bolt circle diameter (BCD) 110mm. This allows to mount chainrings with 34t. up to 53t.
There is a spider with BCD130mm available. For BCD130, we can deliver chainrings from 38t. up to 75t.
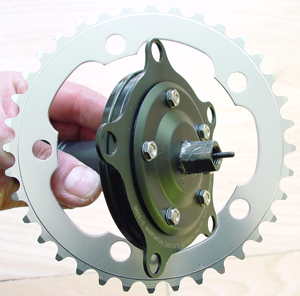
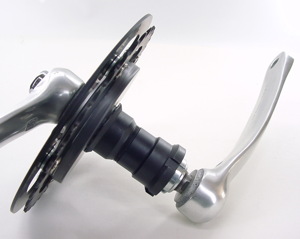
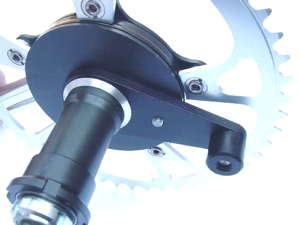
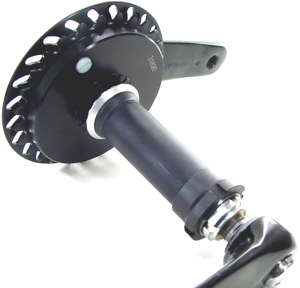
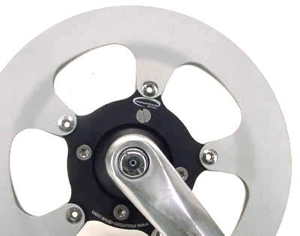
The mountain-drive housing comes either with a torque lever (see photo on the right), that holds the reaction torque of the planetary gearing system.
Or with cone rings, that make installation easy, even if there is no chainstay to fit the anti-twisting bracket.
The unit is designed for BSA bottom bracket, but doesn't need the BSA threads, as it is clamped and not screwed in. The inner diameter of the BSA bottom bracket is in the range of 33.6 up to 34mm. There are adapters available for larger diameters (m-d with torque lever only).
Photo: mountain-drive with torque lever and clamp for the chainstay |
 |
| |
zurück |
D.1.2. mountain-drive cargo version
For rikshas, tandems and applications with double or even triple chainring please take the "Cargo" version, that comes with a steel spider, which is screwed on by 8 screws. Steel spiders are available in BCD110 and BCD130mm.
Please note: You cannot retrofit a steel spider to a standard mountain-drive. |
 |
| |
|
D.1.3. mountain-drive - Reha - version
The Reha-version of mountain-drive has a modified shifting shaft with an activation force optimized for hand operation, therefore lower pressure needed for shifting. It comes with two instead of four planet gears to provide highest possible efficiency at lowest possible resistance. |
 |
| |
|
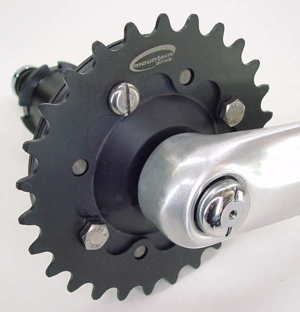
D.1.4. mountain-drive with 27-tooth chainring
For extrem low gears there is a 27t. chainring available. It equals a chainring of just 11t. in low gear mode! It is mounted at the position of the spider.
A trouser guard for this size is available, too. |
 |
| |
zurück |
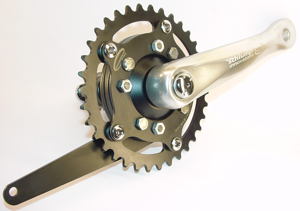
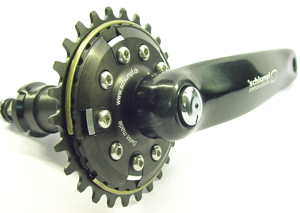
D.1.5. mountain-drive and multiple chainrings
Although there may be only few applications for multiple chainrings, they are used for fine tuning a gearing range from time to time.
We recommend to take the Cargo version with the steel spider. For moderate torques and forces, the standard aluminum spider may do the job as well.
Photo on the right: 48 and 38t. chainrings on a mountain-drive.
Second photo: 40 and 27t. chainrings
Third photo: mountain-drive Cargo version with triple chainrings 56 - 48 - 38 on BCD130 spider. |
 |
| |
|
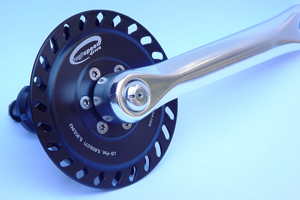
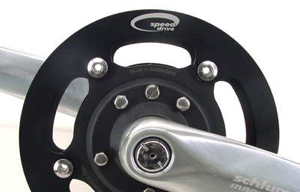
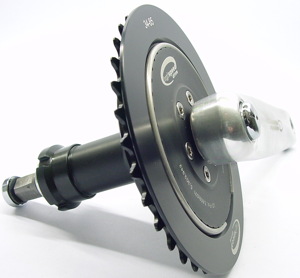
D.2. speed-drive
The standard version of speed-drive is designed for a bottom bracket width of 68 up to 72mm and BSA size, but doesn't need the BSA threads, as it is clamped and not screwed in. The inner diameter of the BSA bottom bracket is in the range of 33.6 up to 34mm. |
zurück |
| |
|
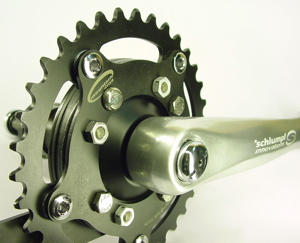
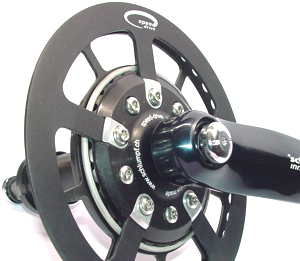
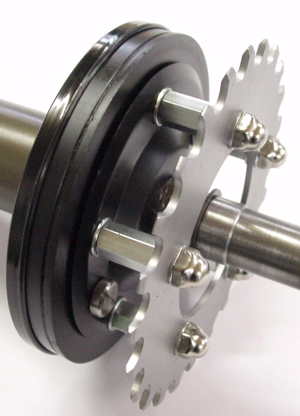
D.2.1. speed-drive - type "BCD110" for screwed-on chainrings with 34 - 53t. and BCD110mm
There are two speed-drive versions available. The "BCD110"-type allows to mount chainrings with 34t. or bigger (up to 53t.). 34t. equals approximately 56t. in high gear mode.
Chainrings up to 40t. are light-weight, Swiss made steel chainrings with hardened surface and a thickness of 2mm.
For any of these chainrings you can get trouser guards, even double sided guards if required, which is often used on folding bikes to prevent the chain from falling off while being folded.
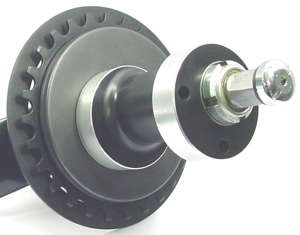
Important remark: chainrings smaller than 40t. must have an inner diameter of 96mm instead of 94mm as usual. If not, they can't be mounted on the left side of the spider (see photo on the right).
All original Schlumpf chainrings come with this inner diameter of 96mm.
|
 |
| |
zurück |
D.2.2. speed-drive - type "08" for small chainrings, starting with 27t.
The second version is the model "08".
The following chainrings are available: 27, 28, 30, 32, 34, 36, 38, 40, 42.
All these chainrings are made by Schlumpf. They are made of corrosion resistant steel and heat treated. Thickness is 2mm.
For all these chainrings, lightweight aluminum trouser guards are available. They can be mounted on the outer side of the chainring. No double sided trouser guard possible on the type "08".
Photo at the top: speed-drive type 08 with 27t. chainring. No trouser guard. The chainring is hold by a snap ring.
Photo at center: speed-drive type 08 with 40t. chainring and trouser guard.
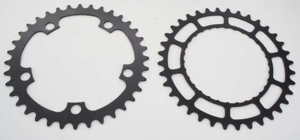
Photo at the bottom: Comparison of chainring with BCD110 (on left side) with Type 08 (on right side). |
 |
| |
zurück |
D.2.3. Adapter BCD110 -> BCD130
This adapter allows to use 5-hole chainrings with BCD130 on a spider with BCD110.
Material: Aluminum
Thickness: 2mm
|
 |
| |
|
D.2.4. speed-drive - Reha - version
speed-drive Reha-version has a modified shifting shaft with an activation force optimized for hand operation, therefore lower pressure needed for shifting. It comes with two instead of four planet gears to provide highest possible efficiency at lowest possible resistance. |
|
| |
|
D.2.5. speed-drive Reha - version with 24t. chainring
A very special version of speed-drive is equiped with a 24t. chainring, screwed on directly to the outer side of the gear housing. Chainline can be varied by the width of the spacer.
Even a trouser guard is available for this version.
Remark: available for handcycle operation only.
The photo shows a version with extra wide spacers between housing and chainring. |
 |
| |
|
D.2.6. speed-drive and multiple chainrings
speed-drive with BCD110 spider allows to mount a double chainring with or without an additional trouser guard.
They are fitted as follows:
Small chainring - spacer - spider - big chainring
|
|
| |
zurück |
D.2.7. speed-drive and Gates Carbon Drive
We don't recommend to combine a speed-drive with a Gates Carbon Drive, as this drive requires high pretension. The result can be worn out bearings and low efficiency. |
|
| |
|
D.2.7.1. Schlumpf ABDS
The Schlumpf belt drive concept ABDS (Advanced Belt Drive System) works without any preload by using the industrial standard of 14mm pitch instead of 11mm of the Gates drive. The belt is much narrower (6mm) instead of 10mm of the Gates design.
Actually, this belt drive is available for manufacturers only (starting at 20 units per order).
If ever considering to use a belt drive, please make sure that you can open the frame (no belt drive link available similar to a chain link!).
More detailled informations on this site (including a tool to calculate the length of the belt and a list with available belt disks and belts):
www.schlumpf.ch/hp/zr/zr_engl.htm
|
 |
| |
zurück |
D.2.8. speed-drive for Strida folder (with eccentric bottom bracket and belt drive with 8mm pitch)
For the Strida folding bike a special version is available, that uses the same eccentric bottom bracket part as the original Strida.
It comes with a (slightly smaller) chainring of 80t. and the adequate belt of 1360mm length, that offers both a smaller gear and a much higher gear, because 80t. in high gear mode equal a belt disk of 132t.!
We recommend to use the tool set "Installation and maintenance Strida", that contains the parts as shown in the photo on the right.
Chamfering the b.b. shell is not required. Installation is exactly the same as with the original eccentric bottom bracket.
Important: different Stridas come with different bottom bracket widths. Our Strida version is designed for bottom bracket widths of 51mm. |
 |
| |
|
D.2.9. speed-drive for eccentric bottom brackets (EBB)
speed-drive is available in a version designed for EBB's. No chamfering of the bottom bracket required, no tightening of the speed-drive. Just mount it the same way as a standard EBB!
The outer diameter is machined according to customer requirements. Please indicate this diameter when ordering.
Pre-condition is an EBB, that is clamped externally. Means, not an internal clamping mechanism as shown in the photo below (Bushnell-type EBB). The clamping device shall be quite strong, not just one or two small set screws! |
 |
| |
|
D.2.10. Central speed-drive
For applications in completely closed drive trains (for example cabin bikes) we offer a speed-drive with a symmetrical design: the chainring sits in the middle, the axle is supported on both sides.
Available either as version "08" for chainrings with 27t. or more teeth or "BCD110" for chainrings with 34t. or more teeth. |
 |
| |
|
D.3. high-speed-drive
The standard version of high-speed-drive is designed for a bottom bracket width of 68 up to 72mm and BSA size, but doesn't need the BSA threads, as it is clamped and not screwed in. The inner diameter of the BSA bottom bracket is in the range of 33.6 up to 34mm. |
zurück |
| |
|
D.3.1. high-speed-drive standard version with 27t. chainring
The standard version is equipped with a 27t. chainring, that equals a 67t. chainring in high-speed - mode. This chainring comes with an integrated trouser guard. It is made of high-quality and very strong 7075 aluminum and has passed an anodic oxidation treatment. This set-up provides high strength combined with low weight and high wear resistance.
The chainring can be exchanged after removing the right crankarm and unscrewing the 6 Torx screws. |
 |
| |
|
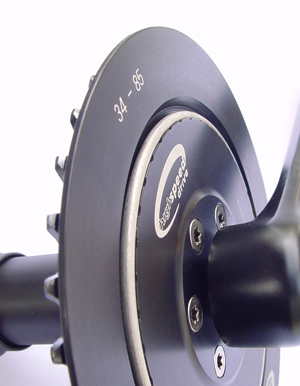
D.3.2. high-speed-drive flange for 30- and 34t.-chainring or adapter for BCD130 chainrings
Instead of the standard chainring with 27t. (held by 6 Torx screws) an externally toothed flange can be delivered, that allows to mount either a 30t. or a 34t. chainring or an adapter with 5 holes and BCD130mm for chainrings with 38t. or bigger.
30 and 34t. chainrings are made of hardened steel, nevertheless very lightweight.
For both sizes trouser guards are available (for right side only).
These chainrings are hold by a circlip (snapring).
If 34t. (=85 in high gear mode!) shouldn't be big enough, please feel free to order an adapter for BCD130 and mount a 38t. chainring or bigger. 38t. equals 95t. in high gear mode!
Caption:
- high-speed-drive with externally toothed flange
- high-speed-drive with 34t. chainring, hold by two circlips
- high-speed-drive with 34t. chainring and trouser guard, hold by one circlip
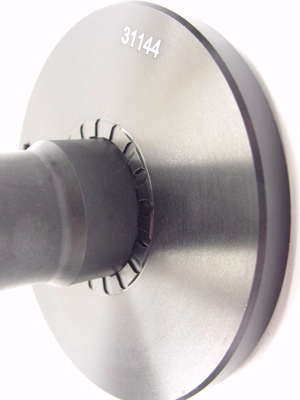
- Adapter for bolt circle diameter 130mm (chainrings with 38t. or bigger)
- Detailscreen of the adapter BCD130
- high-speed-drive with 44t. chainring (=110t. in high gear mode) and trouser guard. Ideal for fast E-bikes and very high speeds! |
 |
| |
|
D.3.3. high-speed-drive and multiple chainrings
Theoretically, two chainrings can be mounted on a BCD130-spider. There won't be many applications for such a set-up... |
|
|
|
E. Installation
General remarks to planetary gearing systems:
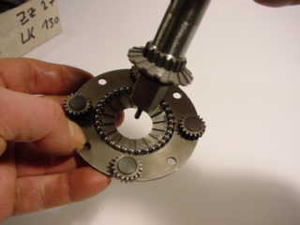
Every planetary gearing systems has three components (ring gear - planet carrier - sunwheel). One is driven, one drives, and one has to hold the reaction torque.
- mountain-drive: sunwheel is driven, ring gear is connected to the frame (doesn't rotate), and the chainring is connected to the planet carrier. There is a left hand reaction torque.
- speed-drive: sunwheel is connected to the frame (doesn't rotate), ring gear is connected to the chainring, and the planet carrier is driven. There is a right hand reaction torque.
- high-speed-drive: sunwheel is connected to the chainring, ring gear is connected to the frame (doesn't rotate), and the planet carrier is driven. There is a right hand reaction torque. |
zurück |
| |
|
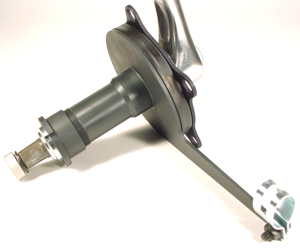
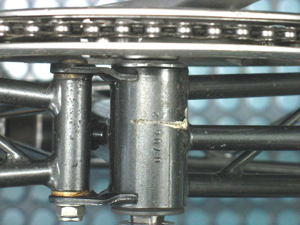
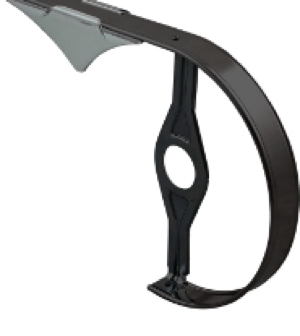
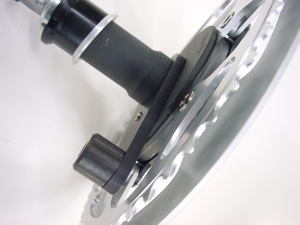
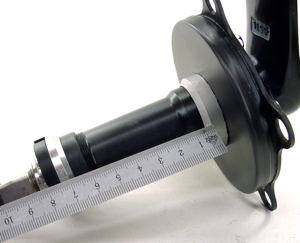
E.1.1. mountain-drive - installation with torque lever (anti-twisting bracket)
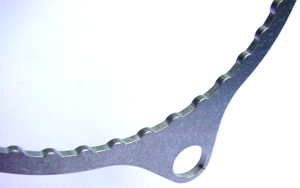
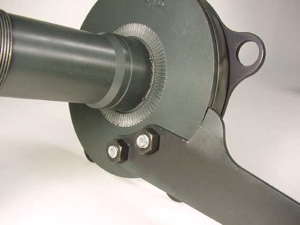
There is a very simple way to hold a mountain-drive against the reaction torque. The housing with integrated anti-twisting bracket doesn't need any modification of the frame at all. The clamp is connected to the rear chainstay. That's it! No chamfering, not even a high tightening torque is required.
You can even bend the lever some millimeters to adapt it to the chainstay perfectly.
One more big advantage is the use of adapter rings. These adapter rings allow to fit a mountain-drive into any diameter of bottom bracket shell (photo shows a mountain-drive with a pair of adapters for diameter 40mm).
The version with torque lever allows also the use of any type of chainguard holder, that is clamped between bottom bracket shell and bearing / gear housing. |
 |
| |
zurück |
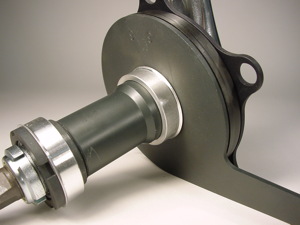
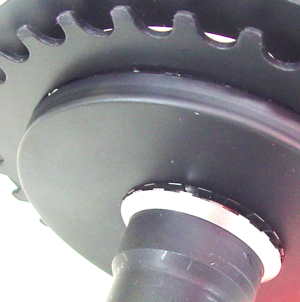
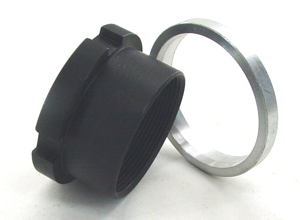
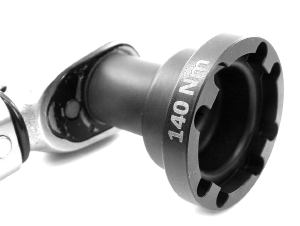
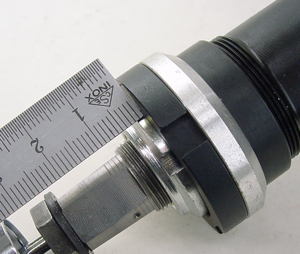
E.1.2. mountain-drive - installation with cone rings
A versatile mode for installation is the installation with cone rings. This allows installation with any frame geometry, with suspension, central boom...
The bevel at both sides of the bottom bracket shell is machined with a milling cutter (available as accessory or as rental tool in most countries: you rent it and send it to the next customer in your country after work has been done).
The cone rings not only hold the reaction torque, they also center the unit perfectly.
Important:
- Correct chamfering (outer diameter of the conical area shall be 39-39.5mm)
- Correct material of the cone ring: aluminum for steel and titanium frame, steel for aluminum frame
- Dry and clean surface without any grease (very important on the right side, where the reaction torque has to be held)
- Correct tightening torque of 140Nm
There are wider cone rings available, if a wider chainline is needed. Or if there is not enough space between chainstay and gear housing.
Please notice: a wider cone ring of 4 and 6mm is used together with a longer nut on the left side.
Important: Don't clamp anything between gear housing and bottom bracket shell! This would reduce the firmness of the seat of the gearing system against the reaction torque seriously and the unit could start spinning under load, when gear is engaged!
Caption:
- Aluminum cone ring with milled grooves on the backside in combination with gear housing with milled grooves
- Milling cutter (available as accessory as well as rental tool in most countries)
- Milling cutter in action
- Four different widths, two different materials (aluminum = silver colour, steel = black colour), three different back side shapes:
-> smooth surface for knurled surface of the housing (left)
-> with 18 milled grooves for a housing with milled grooves
-> knurled surface of a steel cone ring for a knurled surface of a gear housing |
zurück
 |
| |
|
E.1.3. mountain-drive - installation into very narrow and very wide bottom bracket shells
For extrem narrow b.b. shells of 50mm width (for example on fully faired cabin bikes) we deliver such a version.
There is also one available for extra wide b.b. shells of 100mm width (Surly, some new E-bikes).
Important: mountain-drive versions for 50- and 100mm- b.b. width are available with torque lever only, as all these versions come with right hand thread of the nut only! |
|
| |
|
E.1.4. mountain-drive - installation into eccentric bottom brackets (EBB)
For direct installation into an EBB's, there is no version of mountain-drive available. Please chamfer the eccentric insert of the bottom bracket as if it were the bottom bracket shell. |
|
| |
zurück |
E.1.5. mountain-drive - left side installation
Since late 2010 all clutches are machined symmetrically. No problem to install a mountain-drive on the left side.
Please notice, that you need a right hand thread for the locking nut instead of a left hand thread for standard installation!
For left hand installation, you mount the crankarms vice versa (but right hand pedal thread still on the right side!). |
|
| |
|
E.1.6.1. Brompton - torque lever
Brompton uses a very thin walled bottom bracket shell on their folding bikes. For mountain-drive, we offer a special anti-twisting bracket to hold the reaction torque.
You can either use cone rings (and chamfer the bottom bracket shell) for perfect centering or use a 90° nut on the left side. In this case, you don't have to modify the frame at all. Please indicate, which manner you prefer, when ordering.
For speed- and high-speed-drive, such an anti-twisting bracket isn't necessary. The standard installation with cone rings works fine here. |
 |
| |
|
E.1.6.2. Screwed-on torque lever
For special applications, to adapt an anti-twisting bracket to an unusual frame, we deliver a screwed-on lever, made of 3mm steel. This makes adaption easy. |
 |
| |
|
E.2.1. speed-drive - installation with cone rings
Please see E.1.2. |
zurück |
| |
|
E.2.2. speed-drive - installation into very narrow and wide botttom bracket shells
For extrem narrow b.b. shells of 50mm width (for example on fully faired cabin bikes) we deliver such a version.
There is also one available for extra wide b.b. shells of 100mm width (Surly, some new E-bikes). |

|
| |
|
E.2.3. speed-drive - installation into EBB (eccentric bottom brackets)
Very elegant is the installation of a speed-drive into an EBB: Specify the outer diameter of the eccentric and installation is nearly done!
Just slide the gearing system into the frame and clamp it!
Available for eccentrics from 53.5 up to 58.5mm and width of 68 up to 76mm.
Important: the frame needs a strong external clamping, not just a small set screw. It doesn't work with Bushnell-type eccentrics (see photo below). |
|
| |
|
E.2.4. speed-drive - left side installation
Since late 2010 all clutches are machined symmetrically. No problem to install a speed-drive on the left side.
Please notice, that you need a left hand thread for the locking nut instead of a right hand thread for standard installation!
For left hand installation, you mount the crankarms vice versa (but right hand pedal thread still on the right side!). |
|
| |
zurück |
E.2.5.1. speed-drive for Brompton folding bike
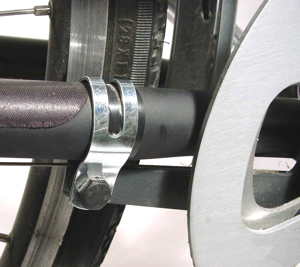
A very popular combination is the Brompton folder with speed-drive. It needs a +6.5mm cone ring to allow folding (the rear chainstay folds where normally the gear housing is located) and a wider nut on the left side to make up for the additional width.
A good set-up is a speed-drive with a 34t. chainring and trouser guard. With such a chainring, you have much lower gears for climbing (34 instead of 50t.) but also much higher gears for speed (56 instead of 50t.). Any other combination is up to your personal preference... |
|
| |
|
E.2.5.2. speed-drive in combination with Rohloff hub
speed-drive can be combined with Rohloff without any restrictions. It gives a dreamlike range of more than 868%! A must on a fast recumbent and many other bike... |
|
| |
|
E.2.5.3. speed-drive for Strida folder (with EBB and belt drive)
For more details please see ->D 2.8. |
 |
| |
zurück |
E.3.1. high-speed-drive - installation with cone rings
The reaction torque of a high-speed-drive is hold by the gear housing. It is possible to use a torque lever, although not very practical, as the lever would be located on the upper-side (right-hand torque). There is one available in special cases.
That's why the best way to install a high-speed-drive is with cone rings.
For more details please see ->E.1.2.
Important: Older high-speed-drives had the cone ring attached to the back side of the housing. The material was aluminum.
For the installation into an aluminum bracket, Loctite was used to hold the reaction torque through the cone area.
New housings with milled slots offer an easier way for installation and a wider range of adaptability.
In case you want to install an older high-speed-drive with integrated cone ring (photo below) into a steel frame, just make sure, that the cone area is dry and clean. No Loctite needed.
In case you want to install an older high-speed-drive with integrated cone ring into an aluminum frame, use Loctite 7471 Activator to prepare the aluminum surface of the right side. After surface is dry, apply some drops of Loctite 638 and tighten the nut on the left side.
Never use Loctite on the left side!!!
|
 |
| |
|
E.3.2. high-speed-drive - installation into very narrow and very wide bottom bracket shells
For extrem narrow b.b. shells of 50mm width (for example on fully faired cabin bikes) we deliver such a version.
There is also one available for extra wide b.b. shells of 100mm width (Surly, some new E-bikes). |
|
| |
|
E.3.3. high-speed-drive - installation into eccentric bottom bracket shells
For direct installation into an EBB's, there is no version of high-speed-drive available. Please chamfer the eccentric insert of the bottom bracket as if it were the bottom bracket shell. |
zurück |
| |
|
E.3.4. high-speed-drive - left side installation
Since late 2010 all clutches are machined symmetrically. No problem to install a high-speed-drive on the left side.
Please notice, that you need a left hand thread for the locking nut instead of a right hand thread for standard installation!
For left hand installation, you mount the crankarms vice versa (but right hand pedal thread still on the right side!). |
|
| |
|
E.3.5.1. high-speed-drive for Brompton folding bike
A very popular combination is the Brompton folder combined with high-speed-drive. It needs a +6.5mm cone ring to allow folding (the rear chainstay folds where normally the gear housing is located) and a wider nut on the left side to make up for the additional width.
A good set-up is the standard high-speed-drive with its 27t. chainring and integrated trouser guard. With such a chainring, you have much lower gears for climbing (27 instead of 50t.) but also much higher gears for speed (67 instead of 50t.). |
 |
| |
|
E.3.5.2. Torque lever for high-speed-drive
There is a torque lever available for high-speed-drive, in case the standard cone rings don't work or there is no bottom bracket shell to be used for holding the reaction torque.
Material: stainless steel, width 2mm |
 |
|
zurück |
| F. Questions with regard to different applications |
|
| |
|
F.1.1. What should I know before ordering a Schlumpf gearing system?
- What are the dimensions of the bottom bracket shell (see also F.1.2.)?
- Which is the shape of the rear chainstay? Does it allow to mount the housing of the Schlumpf drive directly to the right side of the bottom bracket shell or does it require wider cone rings? The housing has an outer diameter of 94mm. The photo on the right shows a set-up (Moulton folding bike), where a protruding screw makes installation impossible at the right end of the b.b. shell. You need a wider cone ring to act as a spacer.
- Can I mount the chainring of my choice where it should be mounted? Means straigth chainline and no interference with the rear chainstay (especially to be considered in combination with mountain bikes. (-> A5.2)
- Is there a fully closed chaincase, which could it make difficult to mount the torque lever of a mountain-drive?
- Is a chainguard held by means of a bracket, which is clamped between bottom bracket shell and gear housing? This is not possible in combination with cone rings (a torque can't be transmitted through such a bracket due to lack of friction).
When ordering, please always inform about the type of bike, where you want to install the Schlumpf drive. |
|
| |
|
F.1.2. What should I measure?
- What is the inner diameter of the bottom bracket shell? Most b.b. shells use BSA standard. No need to measure it, if it is a BSA size (inner diameter of 33.6 up to 34mm).
- Is the wall thickness at least 2.5mm for a steel b.b. shell and 3mm for an aluminum b.b. shell?
- Is the width of the b.b. shell at least 68mm and not more than 73mm? |
|
| |
zurück |
F.1.3. What should I check before installing a mountain-drive into a mountain bike?
- Can I mount the chainring of my choice where it should be mounted? Means at the place of the medium chainwheel of the former triple chainring set, to give a more or less straigth chainline when driving in the middle gear. Is there any interference with the rear chainstay (-> A5.2) |
|
| |
|
F.1.4. Schlumpf drive for a Brompton
Simply give us the information "for Brompton" when ordering and we choose the correct set-up (see also E.1.6.1). |
|
| |
|
F.1.5. Can I mount a Schlumpf drive into a tandem? At the front or rear position?
On a tandem, both riders want to pedal with the same frequency. That's why a Schlumpf drive must be installed at the rear position and chain should be on the left side between stoker and captain.
The same left crankarm at the stokers position can be
used as before.
Please choose the "Cargo" version for tandem use. |
|
| |
|
F.1.6. Are Schlumpf drives strong enough to be used on heavy transportation bikes or rikshaws?
Yes.. All Schlumpf drives are designed for torques up to 250Nm and therefore extremely robust. If using mountain-drive for heavy duty applications please choose the "Cargo" version with reinforced steel spider.
Please check if the rear gearing component withstands the load you want to apply! |
|
| |
zurück |
F.1.7. My application requires freewheeling in one or both gears. Is this possible?
Yes, it is. We offer a freewheel-clutch, that allows free back pedaling.
It's your choice if freewheeling is for both high and low gear or just for one position. |
|
| |
|
F.1.8. My application requires no contact between crankarm and axle in one position. Is this possible?
Yes, even this is possible. We have a modified clutch available, that engages into one gear only. You choose if it shall engage into high or low gear. |
|
| |
|
F.1.9. My bottom bracket shell has a width of 73mm (American standard). Which drive fits?
For a correct installation the 10mm longer axle is the best solution. Combine it with a +2mm cone ring on the right side and a +4mm cone ring on the left side. The chainline increases by 2mm, which can be corrected by using 2mm-washers between spider and chainring.
The material of the cone ring is important on the rigth side only, where the reaction torque has to be held. On the left side, we deliver an aluminum cone ring with smooth surfaces together with a 90° grooved nut.
An alternative is to take the standard version and to use a +6.5mm grooved nut on the left side. Please check, if the left crankarm doesn't interferes with the rear chainstay, because the unit is slightly our of center (by using the +6.5mm spacer).
Off-set crankarms may help.
When ordering, please always indicate such special set-ups. This allows us to recommend the best solution!
|
|
| |
|
F.1.10. When comes the downhill - speed-drive ("Triebwerk"?
As soon as more resources are available, we will restart work on this exciting project! |

|
|
|
| G. Accessories |
|
| |
zurück |
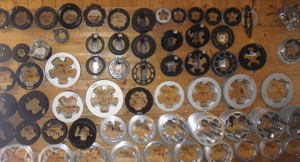
| G.1. Chainrings |
|
| |
|
G.1.1. Bolt circle diameter (BCD) 110mm
Available are: 34, 36, 38, 40, 42, 44, 46, 48, 50, 52, 53t.
Material: 34 - 40t. made of hardened steel (thickness: 2mm), bigger than 42t. made of aluminum
Colour: steel chainrings have a black finish, aluminum chainrings a silver finish.
|
|
| |
|
G.1.2. Bolt circle diameter (BCD) 130mm
Available are: 38, 40, 42, 44, 46, 48, 50, 52, 54, 56, 60, 65, 70, 75t.
Material: all made of aluminum.
60t. and bigger CNC-milled 7075 aluminum. |
|
| |
|
G.1.3. Adapter BCD110 -> BCD130
2mm thick, black anodized aluminum adapter, that allows to mount BCD130-chainrings on a speed-drive spider with BCD110mm. |
|
| |
|
G.1.4. Chainrings for speed-drive model "08"
Available are: 27, 28, 30, 32, 34, 36, 38, 40, 42
Material: hardened steel (thickness: 2mm) |
|
| |
|
G.1.5. Chainrings for high-speed-drive
Available are:
- 27t. standard chainring with integrated trouser guard, made of strong 7075 aluminum with anodization.
Standard finish is black anodized. High polished and chrome plated chainring on request.
- 30- and 34t. chainrings, made of hardened steel, thickness 2mm
- Chainrings with 38t. and bigger for BCD130 (requires the flange with BCD130mm adapter) -> D.3.2.
Material: aluminum, silver finish
|
 |
| |
zurück |
G.1.6.1. mountain-drive 27t.
This chainring is mounted directly to the outer side of the gear housing of a mountain-drive instead of the spider. Can't be retrofitted to a standard mountain-drive. |
|
| |
|
G.1.6.2. speed-drive 24t.
Special version for hand bikes only. Requires a special housing. Can't be retrofitted to a standard speed-drive. |
|
| |
|
| G.2. Trouser guards |
|
| |
|
G.2.1. Trouser guards for standard bolt circle diameters BCD110 and BCD130
Available are:
BCD110: 34-36, 38-40, 42-44, 46-50, 52-53
BCD130: 38-40, 42-44, 46-48, 50-52, 54, 56
Material.: up to 44t. made of 2mm aluminum, bigger ones made of 2.5mm aluminum
Finish: up to 40t. in black or silver, bigger than 42t. in silver powder coated |
|
| |
|
G.2.2. Trouser guards for speed-drive type "08"
Available are:
27, 28-30, 32-34, 36-38, 40-42
Mat.: Aluminum, thickness 2mm
Finish: black anodized (standard), silver anodized (on request) |
|
| |
|
G.2.3. Trouser guards for high-speed-drive
- 27t. standard chainring comes with integrated trouser guard (standard finish: black anodized, high polished and chrome plated on request)
- for 30- and 34t. chainrings: trouser guards made of strong aluminum, black anodized available
- for chainrings BCD130 and 38t. chainrings or bigger: BCD130 trouser guards available. Standard finish: 38-40t. black anodized, bigger than 40t. silver powder coated |
|
| |
zurück |
G.2.4. Double sided trouser guards
All trouser guards BCD110 and 130 can be mounted either on left and/or right side of chainring. We have the chainring bolt sets, that fit any combination!
speed-drive model "08" as well as high-speed-drives up to 34t. can't be equipped with double sided trouser guards. |
|
| |
|
| G.3. Cone rings and locking nut |
|
| |
|
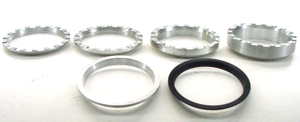
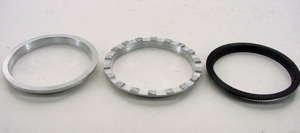
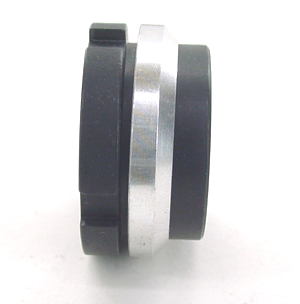
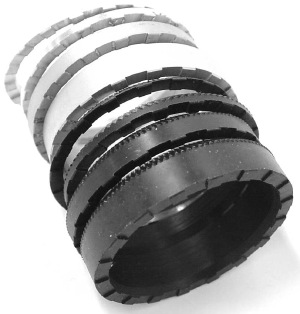
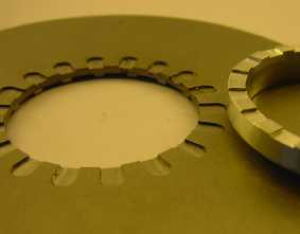
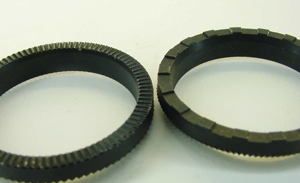
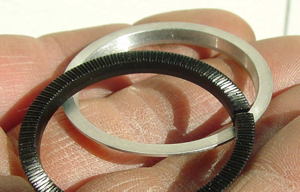
G.3.1. Material and shape of cone rings
- For steel and titanium frames, use cone rings made of aluminum.
- For aluminum frames use cone rings made of hardened steel with a knurled surface on the conical part
- Cone rings from model year 2010 and later have 18 milled grooves on the backside of the cone ring, that engage into grooves milled into the backside of the housing. There is a second type with a knurled surface. Don't mix up milled and knurled cone rings!
Caption:
- aluminum and steel cone rings of different width and with milled grooves on the backside
- aluminum cone ring with smooth surface (for knurled gear housing) and steel cone ring with knurled surface (for knurled gear housing) and a slot to match the bevel of the bottom bracket shell perfectly. |
 |
| |
|
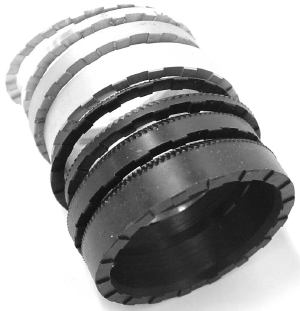
G.3.2. Width of cone rings
- Standard cone rings have a width of the cilindrical part of 0.5mm.
- There are extra wide cone rings with additional 2mm, 4mm or even 6.5mm width.
- For 4 and 6mm wide cone rings, please order the adequate grooved nut for the left side.-> G.3.3. |
 |
| |
|
G.3.3. Grooved nuts for wider cone rings and/or wider bottom bracket shells
Important: if you have a cone ring with 4 or 6mm additional width (or a bottom bracket shell with 72mm or more width, please order the adequate grooved nut for the left side. If you use the standard nut, the left axle bearing won't be guided and therefore the whole crankarm-axle unit will have play (-> I.16.6..
From left to right: standard grooved nut with 45° shape, nut +6mm with 90° shape, nut +6mm with 45° shape |
 |
| |
|
G.3.4. What is a 45° grooved nut?
The 45° grooved nut is used for all installations with cone rings. It centers the unit perfectly on the left side.
They are available in three different widths to compensate cone rings on the right side with additional width. If a wider cone ring is combined with the wrong nut on the left side, the left industrial ball bearing probably isn't guided and the unit has play in the bottom bracket shell.
The photos show a 45°- and a 90°- grooved nut (see also G.3.5.).
Grooved nuts for mountain-drives have a left hand thread, for speed- and high-speed-drive a right-hand thread. |
|
| |
|
G.3.5. What is a 90° grooved nut?
The 90°-nut is used in combination with torque levers or special cone rings.
In combination with torque levers, shims of 0.1mm thickness are used to center the unit perfectly in the bottom bracket shell.
The 90° nut is available in three different widths to make installation possible even for unusual combinations.
It also allows the combination with different cone rings. In this case, aluminum cone rings with smooth back side are used, as there is no torque to be transmitted on the left side.
The photo above shows a 90° grooved nut with a +2mm cone ring with smooth backside.
The photo below shows a 90° grooved nut with 0.1mm shims.
Grooved nuts for mountain-drives have a left hand thread, for speed- and high-speed-drive a right-hand thread. |
|
| |
|
| G.4. Crankarms |
zurück |
| |
|
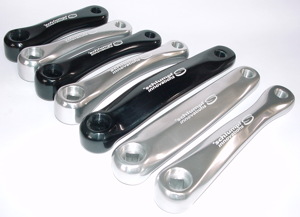
G.4.1. Available lengths, shapes and finishs
Availabe lengths, shapes and finishs:
- 89mm, straight shape, chrome plated, material steel
- 102mm, offset shape, polished silver-gray surface or black anodized
- 114mm, offset shape, polished silver-gray surface or black anodized
- 127mm, offset shape, polished silver-gray surface or black anodized
- 140mm, offset shape, polished silver-gray surface or black anodized
- 152mm, offset shape, black anodized only
- 155mm, straight shape, polished silver-gray surface or black anodized
- 160mm, offset shape, polished silver-gray surface or black anodized
- 165mm, offset shape, polished silver-gray surface or black anodized
- 170mm, straight shape, polished silver-gray surface or black anodized
- 170mm offset shape: not available actually
- 172.5mm, offset shape, polished silver-gray surface or black anodized
- 175mm, offset shape, polished silver-gray surface or black anodized |
 |
| |
|
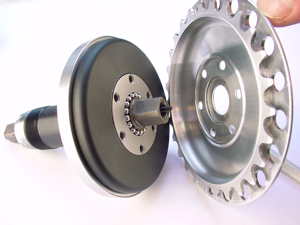
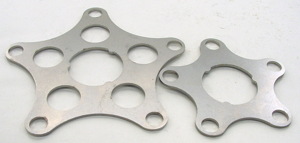
G.5. Adapters for rear cogs
For the most common types of internal hubs we deliver adapters:
- adapter with BCD74mm made of hardened, stainless steel, thickness 2mm
- adapter with BCD110mm made of hardened, stainless steel, thickness 2mm
- washers to compensate for side play, thickness: 0.5mm
- cogs for BCD74mm: 24, 26, 28, 30, 32t. (diameter of holes: 10mm)
- cogs for BCD110mm: 34, 36, 38, 40, 42t.... |

 |
|
|
| G.6. Tools |
|
| |
zurück |
| G.6.1. Tools for installation |
|
| |
|
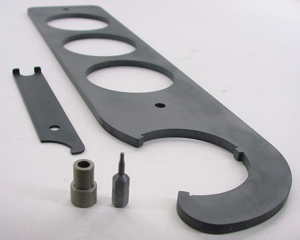
G.6.1.1. Milling cutter / rental service
- 45°-milling cutter: With this tool, you can easily chamfer the bottom bracket shell on both sides to prepare for the installation with cone rings.
In many countries we have a rental tool service: you use the tool and then send it to the next customer in your country.
Remark: new and very sharp tools may cause a kind of "chatter marks". These marks even increase form closure and aren't disadvantegous at all. |
|
| |
|
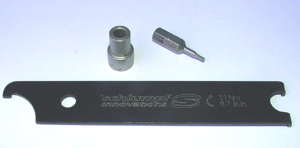
G.6.1.2. Toolset for installation and maintenance
This tool set contains all that you need for easy installation, except the milling cutter and a 14mm standard box wrench.
You find:
- the big box wrench for tightening the left grooved nut (left hand thread for mountain-drive, right hand thread for speed- and high-speed-drive). This box wrench can be combined with a 1/2" ratchet or torque wrench.
- a small wrench for adjusting gearing play and holding the gear shift button while tightening the small set screw inside the button
- 1.5mm Allen bit for tightening the set screw of the gear shift button
- small tube, which is used if a crankarm is pulled off to prevent the thin shifting shaft from being damaged by the puller
|

 |
| |
|
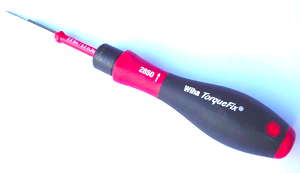
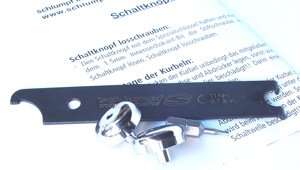
G.6.1.3. Torque screw driver for tightening gear shift buttons
Gear shift buttons very often get lost. There is no reason for!
If it is tightened with the appropriate torque of 1.1Nm, you cannot unscrew or even lose a button. We grant a lifelong warranty on gear shift buttons, if tightened with this tool!
If you are a professional, don't hesitate to have this tool in your workshop. It's worth to buy! |
 |
| |
|
G.6.2. Toolset for maintenance
This is the same toolset as "installation and maintenance" just without the box wrench for tightening the grooved nut:
- a small wrench for adjusting gearing play and holding the gear shift button while tightening the small set screw inside the button
- 1.5mm Allen bit for tightening the set screw of the gear shift button
- small tube, which is used if a crankarm is pulled off to prevent the thin shifting shaft from being damaged by the puller |
 |
| |
zurück |
| H. Service and maintenance |
|
| |
|
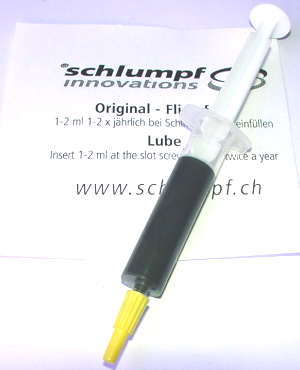
H.1. Recommended service intervals
We recommend to lube a gearing system once or twice a year with 1-2 ml out of the syringe with original MoS2-lube from Schlumpf.
Every 5'000km check the chainring for side play. Don't confound side play with a play in the direction of circumference of the chainring, which is normal and necessary for proper shifting!
Also a minor play in the direction of the spindle is normal, as it helps to avoid side load on the left industrial bearing. -> H.4. |
 |
|
|
| H.2. Where to lube? |
zurück |
| |
|
H.2.1. Lubrication of mountain-drive
Every mountain-drive has one slot screw on the outer side. Remove it to fill in the lubricant.
The Cargo version comes with 4 hex screws. One of them can be removed. |
 |
| |
|
H.2.2. Lubrication of speed-drive "BCD110"
speed-drive BCD110 comes with one slot screw on the right side. Remove it to fill in the lubricant. Please turn the crankarm until you can see a second hole underneath the first one to make sure, that the lubricant reaches the gears, which are behind the rotating planet carrier. |
 |
| |
|
H.2.3. Lubrication of speed-drive "08"
Model "08" has a total of 10 Torx screws on the outer side (for T25 key).
Remove one of them to fill in the lubricant. Please turn the crankarm until you can see a second hole underneath the first one to make sure, that the lubricant reaches the gears, which are behind the rotating planet carrier. |
 |
| |
|
H.2.4. Lubrication of high-speed-drive
The slot screw is on the back side of the housing. |
 |
| |
|
| H.3. Specifications of lubricant |
zurück |
| |
|
H.3.1. Temperatures not under -5°C
The Schlumpf lubricant is a universal grease on the base of MoS2, available in 5ml syringes. It has a higher consistency than oil but less stiffness than grease - therefore an ideal lubricant for not too low winter temperatures. |
|
| |
|
H.3.2. For termperatures much below -5°C
If your next journey leads you to the North or South pole, please take at least one SFR (Super Friction Reduction) spray with you. Apply a small portion together with a portion of the original Schlumpf grease (-> H.3.1.) |
 |
| |
|
H.3.3. Oil instead of grease
From a tribological point of view, a good bicycle oil (or a good quality gearbox oil) is suitable, too. Even at very low temperatures!
Please consider, that the sealing of a Schlumpf drive is not designed to retain an oil bath, therefore oil has to be replaced more frequently than grease! |
|
| |
|
H.4. Adjusting the gearing play
There are three different sorts of play (see also I.4. - I.6.):
- Every Schlumpf drive comes with 0.1 to 0.2mm play in the direction of the spindle. After tightening the gearing system with the appropriate torque (140Nm), this play mostly disappears. This initial play prevents the left industrial ball bearing from stress in the direction of the spindle.
- If you hold the left and the right crankarm and try to wobble them in lateral direction, a play can indicate a worn out left industrial bearing (or an inadequate grooved nut on the left side, because it doesn't guide the left bearing correctly). These industrial bearings have a life expectance of 20'000 to 30'000km. (See also I.16.6.)
- The typical play of the planetary gearing system can be felt by moving the chainring in lateral direction. This doesn't have something in common with play of the crankarms nor side play of the spindle.
If you can move the chainring, this play can be adjusted by the self locking nut on the left side. A few degrees should be enough to neutralize this play.
Important: don't tighten this nut too much! Preload on the bearing leads to higher resistance and wear on all bearings.
If you don't know, if the gearing play is adjusted correctly, unscrew the self locking nut on the left side of the axle approximately 1/4 to 1/2 turn. Now try to move the chainring in lateral direction. If you feel the play, start tightening the self locking nut slightly, until the play disappears!
No play, but also no preload!
|
|
| |
zurück |
H.5. How to dismantle a Schlumpf drive
Very important hint: A Schlumpf drive has quite a simple set-up and is therefore easy to maintain. Indeed, if you aren't familiar with mechanical stuff, please contact your dealer for maintenance of your Schlumpf gearing system!
If treated correctly, it shouldn't be necessary to disassemble a Schlumpf drive at all!!
If there is any reason for uninstalling and disassembling a mountain-, speed- or high-speed-drive, please download the manual (pdf-format), that describes the procedure step by step, illustrated by many photos. |
|
| |
|
H.6. Which torques for which screws?
General:
- Grooved nut of a drive with cone rings: 140Nm (100 lbft)
- Grooved nut of a drive with torque lever: ca. 100Nm (70 lbft)
- Axle bolt: 50-55Nm (35-38 lbft)
- Gear shift button: 1.1Nm (0.8 lbft)
- Self locking silver nut on the left side of the axle: no preoad
- Screwed-on chainrings: 12-14Nm ((8.5-10 lbft)
mountain-drive:
- Spider: 12Nm (8.5 lbft)
speed-drive:
- 5 cup nuts of model "BCD110": 8Nm (5.5 lbft)
- 10 Torx screws of model "08": 8Nm (5.5 lbft)
high-speed-drive:
- 6 Torx screws for mounting chainring: 8Nm (5.5 lbft) |
|
|
|
| I. Problems and solutions |
|
| |
|
I.1. Gear shift button got lost
If a gear shift button hasn't been tightened with the appropriate torque of 1.1Nm, it can unscrew and get lost.
We deliver either:
- one single spare gear shift button including set screw M3
- one set of two buttons with tools for tightening
For the professional: please use the 1.1Nm torque screw driver. This tool gives a 100% reliability against lost of buttons.
We grant a lifetime warranty against lost of buttons, if they have been installed with this tool!
|
 |
| |
|
I.2. Schlumpf drive seems to shift automatically
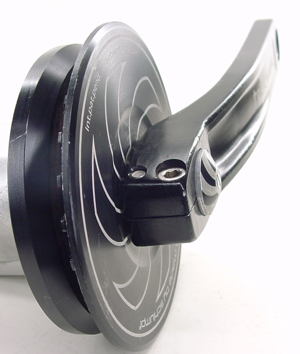
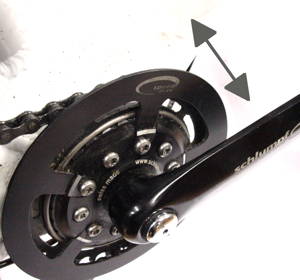
If a Schlumpf drive shifts from one into the other gear without activating a gear shift button, the reason often is an unequal pretension of the kickplates (easy-shift levers).
These levers are slightly preloaded to prevent them from "rattle" on the crank surface. The amount of preload is shown on the photo on the right.
Good News: From February 2012 we will deliver kickplates with a modified fixation: they are still clamped between pedal and crankarm but are equipped with a solenoid, which acts on a steel gear shift button. Therefore no need to preload the kickplates and no danger of unexpected shifting!
If you want to replace old kickplates, you can exchange the gear shift buttons and mount two steel buttons (black colour -> photo on the right) together with the new kickplates with a solenoid inside.
|
 |
| |
|
| I.3. Worn out chainrings |
zurück |
| |
|
I.3.1. Screwed-on chainrings
The only thing you should consider if replacing screwed-on chainrings: chainrings with 40t. or less have to be turned out in the inner diameter by 2mm (inner diameter must be 96 instead of 94mm).
If not, you can't mount the chainring on the left side of the spider.
All Schlumpf chainrings come with the adequate inner diameter.
Hint for easy tighting: Put a little portion of grease on the threads and the nut won't spin. Done so, it's easy to tighten the screw to the correct torque. |
|
| |
|
I.3.2. Chainrings for speed-drive "08"
They are hold by a circlip and can be exchanged easily.
The appropriate trouser guard is clamped by means of 5 small aluminum plates, tightened with Torx-screws (Torx wrench T25). |
 |
| |
|
I.3.3. Standard chainring high-speed-drive 27 teeth
1. Dismount the right crankarm (-> I.13.) Don't forget to use the small tube to protect the thin shifting shaft while pulling off the crankarm with a standard puller!
2. Unscrew the 6 Torx screws (Torx wrench T25), that hold the chainring. In case of loosing a screw: they mustn't be longer than 6.7mm! Please use the original Schlumpf parts, if replacing such a screw!
3. Tightening torque: 8 Nm (5.5 lbft)
Standard 27t. chainrings are black anodized. High polished and chrome plated chainrings availabe on request.
|
|
| |
zurück |
I.3.4. Special chainrings for high-speed-drive with 30 and 34t.
They are hold by two circlips (if no trouser guard is mounted) or with one circlip in combination with a trouser guard. |
|
| |
|
I.4. Side play of the chainring
Please see also H.4.
Side play of the chainring can easily be removed by tightening the self locking nut on the left side of the axle. A few degrees are sufficient.
No play - but also no preload! |
 |
| |
|
I.5. Side play of the axle
Please see also H.4.
A minor play in the direction of the spindle is normal and prevents the left industrial bearing from exzessive play in axial direction.
After assembly (before being installed) the unit has 0.1 up to 0.2mm of axial play. After tightening with 140Nm, this play mostly disappears.
Important: This play can't be adjusted and is not disadvantageous at all for a proper function.
|
 |
| |
|
I.6. Side play of the crankarms
Please see also H.4.
If you hold the left and the right crankarm and try to wobble them in lateral direction, a play can indicate a worn out left industrial bearing (or an inadequate grooved nut on the left side, because it doesn't guide the left bearing correctly: please see F.16.6. for further explanations).
These industrial bearings have a life expectance of 20'000 to 30'000km.
Such a play can't be adjusted by the self locking nut!
|
 |
| |
|
I.7. Sound is coming out of the gearbox
At the beginning, minor noise emission is normal and will disappear after a few hundred miles.
If the frame is a big volume aluminium case, it can act like a violin body and amplify the smallest sound!
If noise appears after many thousand of miles and is in direct drive only (when high or low gear aren't engaged), the planet gears may run dryly. Please insert some lube.
General comment: the longer a planetary gearing system runs, the smoother and noiseless it will be.
In direct drive of mountain-drive, the planet gears are running without any load. They may generate little bit more noise than in geared-down mode, when load is on planets. |
|
| |
zurück |
I.8. Drive doesn't shift into both gears
- Please check position of gear shift buttons first. If they are in pushed position, there must be some play underneath the button. If there is no play, the shifting shaft can't reach its end position and clutch can't engage correctly.
- If you use easy-shift kickplates, please see I.2. To check, if the kickplates are the reason for the malfunction, please remove them (by unscrewing the pedals).
- If you changed a crankarm and you can't shift into both gears afterwards, you may have forgotten to use the small tube, that protects the shifting shaft while the crankarm is pulled off the axle.
In this case, you have disengaged the shifting shaft from the clutch, which can't be undone without disassembling the drive completely! |
|
| |
|
I.9. Drive disengages from time to time
- One reason can be wrong adjustment of gear shift buttons during long time. If there was no play underneath the button in the pushed position, clutch may not have engaged completely. With the consequence, that there was too high load on the edges of the clutch and therefore the edges got rounded.
- Another reason may be too high side play of the chainring. Please check this play carefully and adjust the self locking nut on the left side to eliminate this play. (-> I.4. |
|
| |
|
I.10. Drive runs with higher resistance after lubrication
- Did you use the correct lubricant (please see also H.2. and H.3.)?
- Did you insert too much lubricant? 2-3 ml are sufficient.
- Did you pay attention, that a speed-drive requires a special position for lubrication (two holes in a row to ensure, that lubricant reaches the gears and not only the clutch)? |
|
| |
|
I.11. Drive runs with higher resistance after tightening the self locking nut
Did you tighten the self locking nut completely instead of only compensating the play? In this case, unscrew the nut about half a turn and repeat correct adjustment of play -> I.4. |
|
| |
|
I.12.Drive runs with high resistance at low temperatures
- Did you use the correct lubricant (-> I.3.)?
Please notice, that many "biycle lubricant" like grease for chains and others are completely inappropriate for a planetary gearing system.
- Did you fill the whole drive with grease? In this case, there is no other remedy than opening and cleaning the inner life.
- Or try SFR Superior Friction Reduction - Spray! Designed for very low temperatures, SFR may help if grease causes too much friction.
And is ideal for arctic temperatures (to be used together with MoS2-grease).
- Or try some good bicycle oil with low viskosity. Don't do that over your expensive Persian carpet, as drive may leak, if lubricated with oil. |
|
| |
zurück |
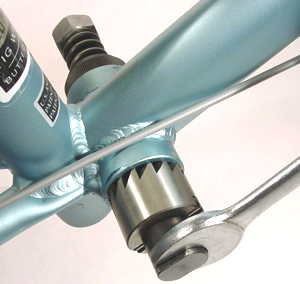
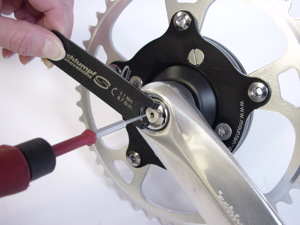
I.13. Dismount a crankarm
- Hold the gear shift button with the small wrench and losen the set screw in the button (1.5mm Allen wrench).
- Unscrew gear shift button.
- Take a common 14mm box wrench and losen the axle bolt. Check, if the washer of the axle bolt has been removed also.
- Before using the crankarm puller, set the small tube from the tool set on top of the axle to protect the thin shifting shaft! If you forget this, the shifting shaft may brake or being bent.
- Check, that the puller is screwed-in completely to prevent the thread of the crankarm to be pulled out!
- Remark on crankarms. If using your own crankarm, please check, that the depth of the hole for the axle bolt is at least 8mm
- Please also check overall thickness of the right crank. It shouldn't be thicker than 25mm. If it is wider, the crankarm can touch the gear housing and block it. |
|
| |
|
I.14. Dismount a Schlumpf drive
To dismount a drive, proceed as follows:
- Dismount crankarm (-> I.13.)
- Please note, that the grooved black nut on the left side has a left hand thread for mountain-drive and a right hand thread for speed- and high-speed-drive.
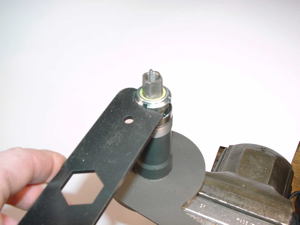
- Please use the original box wrench of the tool set "installation and maintenance". The drive is tightened with 140Nm, quite a high torque. If you don't have the appropriate tool, it can be very hard to unscrew the nut!
- There are a few exceptions of the general rule "right-hand thread" - "left-hand-thread": if a drive is installed on the left side and turns vice versa to its original rotational direction, the left hand / right hand rule is inverse! mountain-drive has a right hand, speed- and high-speed-drive have left hand threads! |
|
| |
|
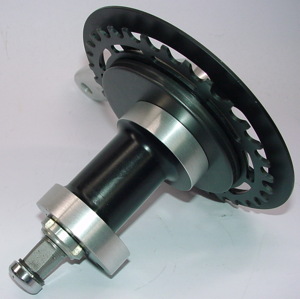
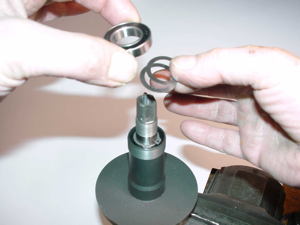
I.15. Change the left industrial bearing
The only wear part during the first 50'000km may be the left industrial bearing.
- For changing this bearing, first dismount the Schlumpf drive (-> I.14.)
- Hold the right crankarm in a vice according to photo on the right.
- Unscrew the self locking nut.
- Lift off the bearing.
- Count the number of shims, that were positioned between circlip and bearing.
- Put the same number of shims between circlip and new bearing.
- Set the new bearing.
-
Adjust gearing play and install the drive again.
|
|
| |
zurück |
I.16. Overview of cone rings
The following cone rings are available:
- Material: steel and aluminum
- Width (of the cilindrical part of the cone ring): 0.5mm, 2mm, 4mm, 6.5mm
- Surface of aluminum cone rings: the conical area is always smooth and non-serrated. The back side is either smooth (non-serrated) for knurled / serrated gear housings or it has 18 milled grooves for gear housings, that come with milled grooves.
- Surface of steel cone rings: the conical area is always knurled / serrated. The back side is either knurled / serrated for knurled / serrated gear housings or it has 18 milled grooves for gear housings, that come with milled grooves, too.
Do not mix up serrated cone rings with milled gear housings or vice versa. This wouldn't work together! |
|
| |
|
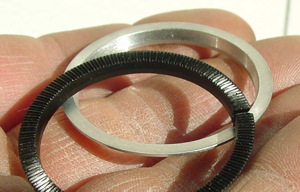
I.16.1. Material
Most important is the correct combination of materials. The cone ring has to excert friction to block the reaction torque of the planetary system. If you combine an aluminum cone with an aluminum bottom bracket shell, friction is low. Same for steel / steel combination.
An aluminum bottom bracket needs a steel cone ring, and a steel or titanium bottom bracket needs an aluminum cone ring! Only this combination secures the drive from slipping under load.
The photo shows a knurled steel cone ring (black) and an aluminum cone ring with smooth surface. Both are for knurled gear housings.
Please notice: the narrow type of steel cone ring is always slotted to match the bevel of the bottom bracket shell perfectly. |
 |
| |
|
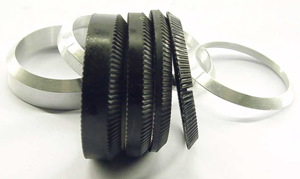
I.16.2. Width
For a standard BSA bottom bracket of 68mm width, in most cases a narrow cone ring (cylindrical width 0.5mm) is appropriate. It's cross section is nearly a triangle. It doesn't add additional width.
If you need additional distance to the frame, you can choose a cone ring, that has an additional cylindrical width of 2, 4 or even 6.5mm (see photo on the right. Different steel and aluminum cone rings all with milled grooves on the backside).
If you use a nut of more than 2mm additional width, please also choose the adequate grooved nut on the left side, or you would lose guidance for the left industrial ball bearing.
Same for wider bottom bracket shells: If you have a 70 or 72mm wide shell, please order a wider nut.
The photo on the right shows three different grooved nuts:
- on the left: the standard nut with a 6mm wide annular section for the wrench and 45° shape for direct mounting into a chamfered b.b. shell.
- middle and right: grooved nuts with additional 6.5mm width, used for installation into Bromptons or other extra wide applications. You see one with 90° and one with 45° shape. The 90° version is used for a mountain-drive with torque lever (no reaction torque to be held), the 45° version is used for any drive with conical installation.
A wider cone ring can be necessary for bikes with wide-spread chainstays, as many mountain bikes have.
The outer diameter of all Schlumpf drive housings is approximately 94mm. This allows you to estimate, if the housing can be mounted directly at the right end of the bottom bracket shell or if it needs an additional width of the cone ring.
Photo at the bottom shows a typical mountain-drive - Brompton setup: the special Brompton torque lever combined with the +6.5mm grooved nut on the left side, with 45° shape and an aluminum cone ring. The cone ring here is for centering only. Not for holding the reaction torque, as this is done by the torque lever. |
|
| |
zurück |
I.16.3. Surface of aluminum cone rings
Surface of aluminum cone rings: the conical area is always smooth and non-serrated. The back side now has either 18 milled grooves for gear housings with milled grooves (all standard-versions), or has a knurled / serrated surface for knurled / serrated gear housings (most reha-versions).
Photo above: aluminum cone ring with milled grooves on the back side for housing with milled grooves
Photo below: aluminum cone ring with smooth surface for knurled housing |
|
| |
|
I.16.4. Surface of steel cone rings
Surface of steel cone rings: the conical area is always knurled / serrated.
The back side now has either 18 milled grooves for gear housings with milled grooves (all standard-versions), or has a knurled / serrated surface for knurled / serrated gear housings (most reha-versions). |
 |
| |
|
I.16.5. Cone rings on both left and right side
If you use the longer version (10mm longer axle, designed for 78mm wide bottom bracket shell) in combination with a standard 68 or 73mm wide bottom bracket shell, you can compensate the missing width by using wider cone rings (see also F1.9.).
Example: a Rohloff hub requires a chainline of more than 50mm. Use the longer axle and two cone rings of 4 and 6mm width. This allows to center the unit perfectly.
On the left side, a grooved nut with 90°-shape is combined with an aluminum cone ring with smooth surface. The material of the cone ring is important on the right side only, where a torque has to be held by means of the cones. |
|
| |
|
I.16.6. Final check
If you have a non every-day set-up, please make the following check before installing the drive:
- screw the grooved nut on the left side till the end of the thread and measure, if the distance between cone rings is at least 1mm shorter than the size of your bottom bracket shell. If not, the nut can come to the end of the thread and cause blocking of the entire drive. Very hard even to unscrew it!
- Check, if the self locking silver nut on the left side protrudes at least 2mm. If not, the industrial bearing on the left side isn't guided by the seat of the nut but only by the thread. The unit will have play as shown in I.6.
- The third photo shows a wrong installation: the self locking silver nut doesn't protrude. The whole drive has play (-> I.6.) and you can't adjust gearing play, as the nut doesn't protrude. |
|
| |
zurück |
I.17. Grooved nut has been well tightened but drive still slips in geared mode
If a failure as described in I.16. has occured, the consequence often is a blocked thread, that doesn't allow to unscrew the drive. In the worst case, the pressed in black tube starts spinning - nothing can be dismounted nor unscrewed...
In this case, the only remedies are the followings:
- first make sure, that you're trying to unscrew the right way round. mountain-drive has a left hand thread, speed- and high-speed-drive have a right hand thread. If the drive is mounted on the left side, the threads are vice-versa.
- second try to losen the grooved nut with a powerful hammer stroke on the extension of the box wrench. This often helps due to inertia.
- last and most serious action: you have to dismount the whole drive by unscrewing not only the left crankarm but also the self locking nut on the axle. Now (except speed-drives with plastic cover) you can pull off the whole unit to the right side. Please do it carefully to avoid, that a lot of balls and springs fall to basement!! Now you have to prepare a piece of aluminum or wood with a diameter of about 32mm. Turn or grind it to a conical shape on one end and hammer it into the black tube. Now you are able to hold the tube as well as to loosening the nut in the correct direction.
If you try to disassemble an older speed-drive (with plastic cover on the left side of the gear housing) this way, you have to snap-off the cover at the same time you are trying to pull the gear out of the housing.
|
 |
| |
|
I.18. Drive slips in geared mode (low gear of m-d, high gear of s-d and h-s-d)
If the drive is slipping in geared mode, the grooved nut on the left side probably hasn't been adjusted properly! This nut has to hold the reaction torque of the drive, means a similar torque as you excert on the pedals has to be held by this nut!
Please check: if you have a mountain-drive or a high-speed-drive, you can see if the housing rotates. If so, remove the left crankarm and tighten the nut properly with 140Nm and a torque wrench! BTW: Did you use the correct cone material? Aluminum for steel frame, steel for aluminum frame! Very important!
If you have a newer speed-drive with steel cover on the back side, you can mark this cover to check, if it slips under load. If it's an older version with plastic cover, a rotating housing isn't visible from outside. |
|
| |
|
I.19. Drive skips every second or third crank revolution
You may drive with too much chain tension! Please reduce tension and try again! |
|
|
|
| J. Warranty |
|
| |
|
J.1. Warranty
There is a five years warranty on all Schlumpf drives starting with the purchase date. There is no warranty on wear parts like chainrings and bearings.
If a drive is dismantled without our written autorization, warranty expires. |
|
| |
|
J.2. What to do in case of a warranty issue?
Should you need to send back a unit to the maker, please send it without left crankarm and without pedals. In this case, the shipment will be less than 2kg and can be sent as "small parcel" just with a small customs declaration (green customs slip) to avoid expenses for customs clearance. |
zurück |
| |
|
|
|
| K. Manuals |
|
| |
|
K.1.1. Here you can find detailled manuals (pdf-format) of an earlier edition. Indeed, most of the informations are identical with the state of the art. The manuals will be re-edited soon.
mountain-drive
speed-drive
high-speed-drive |
zurück |